

You will learn how to host a static website (over HTTPS/SSL) using Amazon Web Services, specifically S3 and Cloudfront. You can host a Javascript application built on JS (Angular, React or Vue) as well. Same principle applies as they are just HTML, CSS, JS files…
If you have been following my earlier series on Building Static website with Hugo & Bootstrap , this would be a continuation of how to now host your website on AWS with no server or hosting account. Free of charge, if you don’t exceed AWS Free Tier limit . Even beyond free tier, the cost is very competitive.
Why host a static website with AWS S3 + Cloudfront
Why do I prefer hosting on AWS + Cloudfront vs traditional webserver hosting?
- Free (within Free Tier limits)
- No backups required, S3 can have version control and AWS has high redudancy for S3
- Practically unlimited storage, if you want to host large files
- Unlimited load handling capacity, and you don’t need to buy big servers or upgrade hosting account.
- Robust global network of 225+ edge locations, so your site is local to whoever is accessing, anywhere
- Easy command line upload/sync options
- As secure as it gets, as very little room to exploit a static website (compared to wordpress or traditional hosting). You do need to keep your AWS credentials safe and use 2FA.
One caveat to above is while the all powerful auto-scaling is great for genuine load and growth. If you are a popular brand and suspect your website can be attached with DDoS attack, it may impact your billing if malicious hackers use millions of hits with large amount of data transfer, this can generate a hefty bill on your AWS account. You may want to consider adding AWS WAF to manage incoming traffic, throttling etc and use AWS billing to create alerts.
For those of you following through my Hugo + Bootstrap series to build a static website, please build your website now by running hugo command. This will generate your /public folder that we will upload.
Create AWS Account & Credentials
If you haven’t got one, go ahead and create an account . I will wait for you.
I do recommend enabling 2 Factor Authentication on your account. It’s a security must for any online service really.
Create S3 Bucket
Open AWS Console and navigate to S3 Console.
Create a bucket
- Bucket Name: example.com
- Region: pick default or the closest to you. It won’t matter for visitors, as your site will be accessed with cloudfront that caches those files globally.
- (Optional) - Bucket Versioning, lets you restore earlier version of files, but increases storage over time.
- Create Bucket
There are two ways to do it. A more feature rich option of making your S3 bucket public and configuring as a static website. This gives you more features such as redirects and managing content headers in S3. However, it exposes your bucket’s public URL and people can navigate without going through your custom domain name. Alternative is to use a REST API endpoint method, but it’s limited in functionality and one deal breaker restriction. I can’t set index.html outside roordir, ex: navigate www.example.com/subdir/ . It won’t lookup index.html in that subdirector location automatically. Workarounds involve lambda functions, but that a lot of hard work and adds latency. So if you are hosting Web application in angular/react/etc then REST API might work as your routes are controlled by client side javascript. But for Hugo based static website, we will have to use public website endpoint option, with some tweaks to ensure higher security. More on AWS Docs if you want the more secure option.
Since we are going with public website, you need to modify this bucket to a S3 Public website.
- Open the bucket and click permissions
- Edit bucket policy and paste below to make it public, but readonly. NOTE: Replace your bucket name in the Resource
{
    "Version": "2008-10-17",
    "Statement": [
        {
            "Sid": "AllowPublicRead",
            "Effect": "Allow",
            "Principal": {
                "AWS": "*"
            },
            "Action": "s3:GetObject",
            "Resource": "arn:aws:s3:::example.com/*"
        }
    ]
}
- Save changes.
- Click Properties
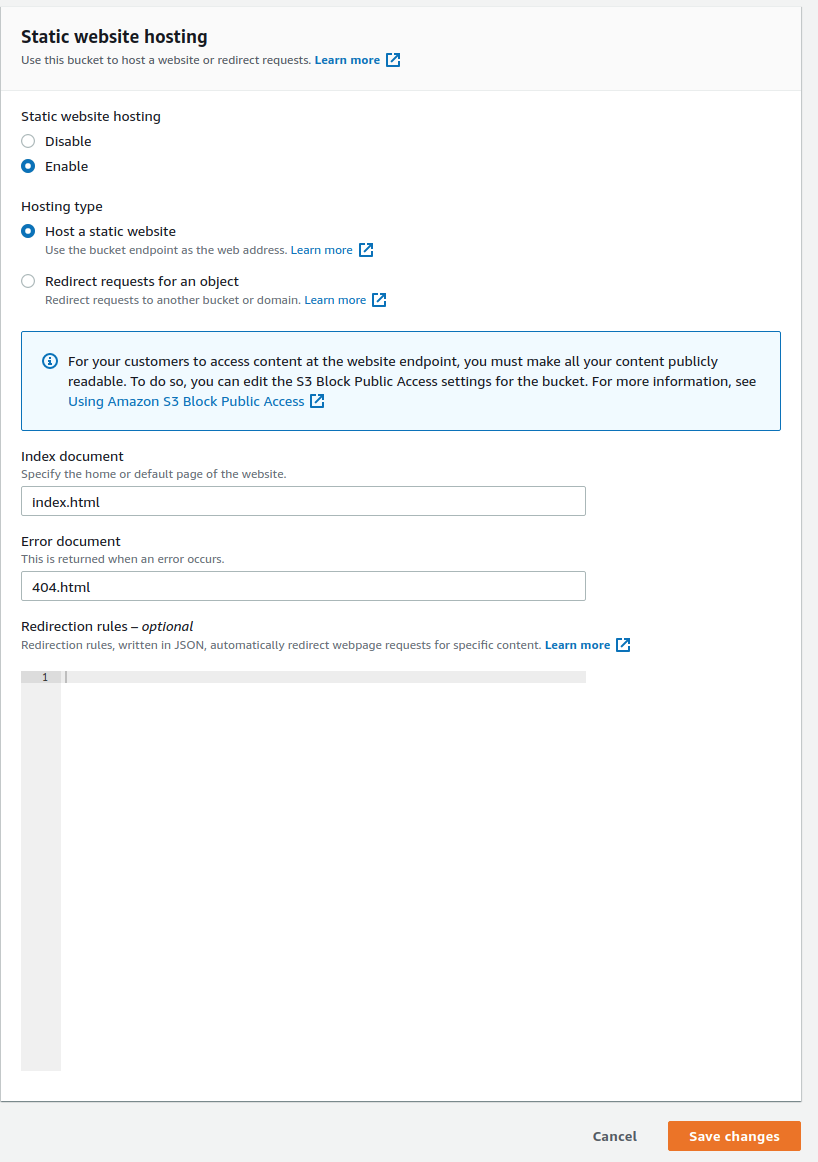
- Scroll all the way bottom, click edit next to static website hosting
- Click Enable
- Select Host as a static website
- Index document: index.html
- Error document: 404.html
- Save changes
If you are migrating from another website and want to create redirects for old URLs to new, you can create redirects here. Click on Learn more link therein to find out how. I will skip it here for brevity’s sake.
- Finally, click Objects and then Upload to upload your static files. Drag and drop your entire
publicfolder with the static website in it.
Go back to public website, you should see a Bucket website endpoint now.
It should look like:
http://www.example.com.s3-website-ap-southeast-2.amazonaws.com/
COPY this and test your website on this link.
Domain & Certificate
I am assuming you already have a domain, else register with your favorite provider or AWS Route53. If you do go with Route53, you will have to then pay for DNS on AWS Route 53 which 0.50 US cent/month. However, Route53 is premium fast DNS and a preferred option, so worth that small price. Otherwise, keep using GoDaddy or whichever domain provider you prefer.
Next we need a SSL certificate from AWS. Open AWS Console and open Certificate Manager.
- Click Request certificate
- Select Request a public certificate option
- Enter your domain name, “*.example.com” (we are requesting wildcard certificate so you don’t have to get one for www.example.com or any other subdomains in future)
- Select Email or DNS validation: only choose email if you are sure your domain registrar contact has your email in it. Hit next.
- Tag Name: Name, Value: example.com. This is an optional step you can skip it if you like.
- Press Review and then if all looks okay,Confirm and Request
- Next, depending on which method you choose follow through instructions on screen to validate your domain
It can take several minutes or more once you end up validating your domain. When it is done, you should see your domain as below:
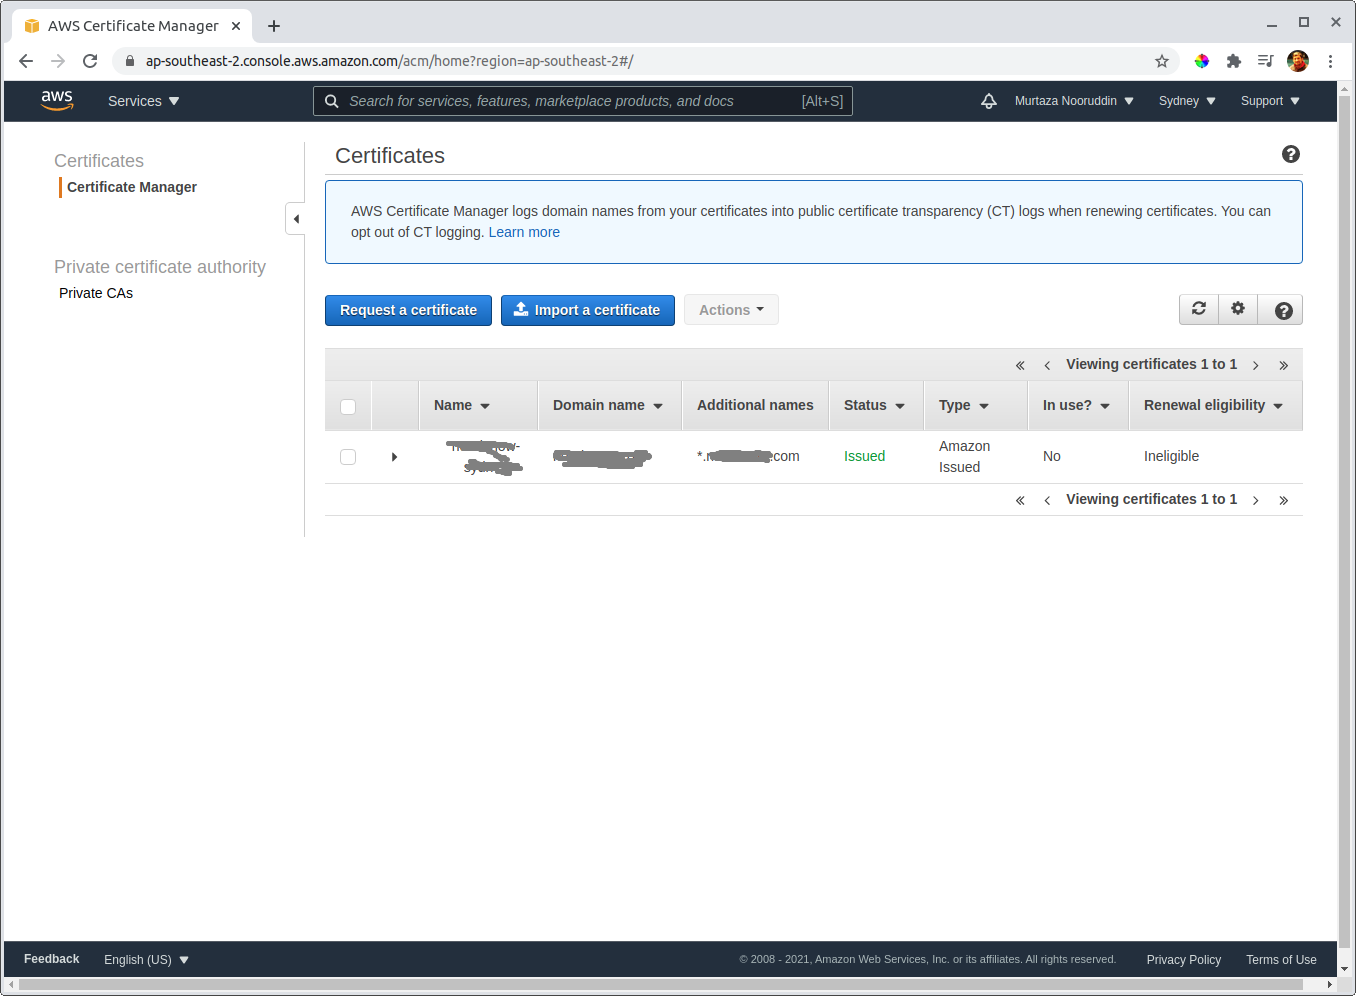
Take a special note for status: issued. This means we are ready. Columns In Use: no and renewal eligibility: ineligible will automatically change to happy values once we assign this to cloudfront. So don’t worry about certificate renewal, its automatic when you use them.
Add CloudFront
- Click Create Distribution
- We will use the Web Option and click Get Started.
- Origin Domain Name : <bucket-name>.s3-website.<aws-region>.amazonaws.com
EXTREMELY IMPORTANT:
Origin Domain Name: When you click it will prefill with your S3 bucket. DONOT use that as it’s different when using static website. Put your “Bucket website endpoint” name there. You can find in S3->Bucket->Properties->(scroll down all the way)-> Static Website Hosting. Copy the value without http:// or trailing slash.
Eg: example.com.s3-website-ap-southeast-2.amazonaws.com
- (Optional): Enable Origin Shield and select your region
- Viewer Protocol Policy:
Redirect HTTP to HTTPS - Compress Objects Automatically:
Yes - Alternate Domain Names (CNAMEs):
example.com - SSL Certificate:
Custom SSL Certificateand your certificate should appear for selection you created earlier using AWS Certificate Manager. - Click Create Distribution
- The distribution is baking in the oven… should be ready in a few seconds or minutes. Click on the distribution and find the Domain Name property. It should have a value like
d2vxrxxxxmt1g7.cloudfront.net. Create a CNAME record for your domain and point it to this cloudfront URL. Also test that URL directly in browser, it should be mapping to your S3 bucket and the website should open. - DNS can take time, so be patient if doesn’t open up your website using custom domain immediately.
Congratulations! You are done with it. Your website will be replicated to 250+ global edge locations and be accessed super fast.
Add content expiry header
It’s good practice to add max-age header to static content, so that the browser can cache that content locally. Good SEO practice as well.
Most webserver, well at least well configured web servers will add that, but it’s not present by default on S3.
- Go to your S3 Bucket
- Select Objects
- Select all Objects, then Actions-> edit Meta Data
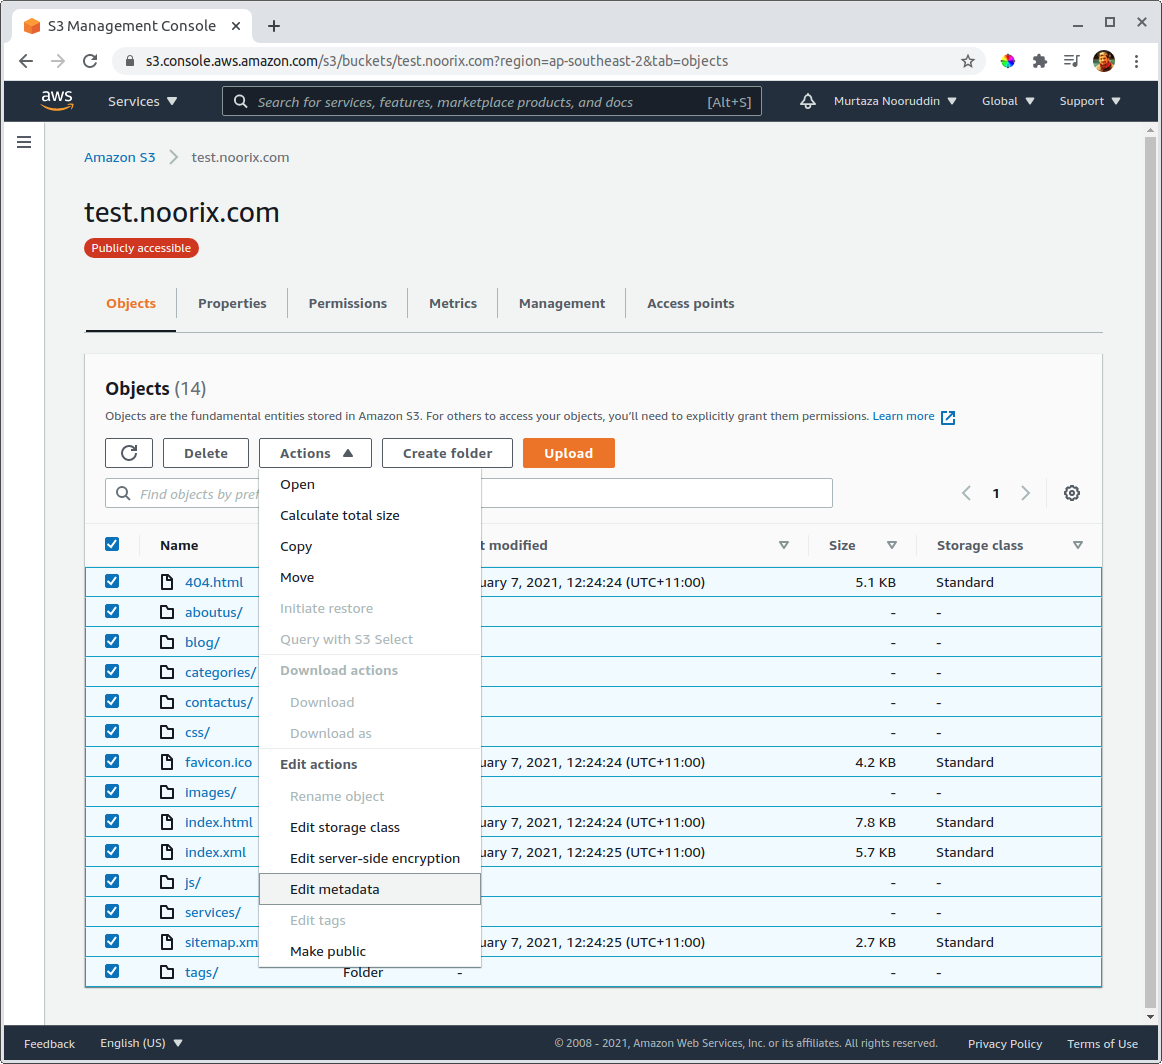
- Next Add Metadata
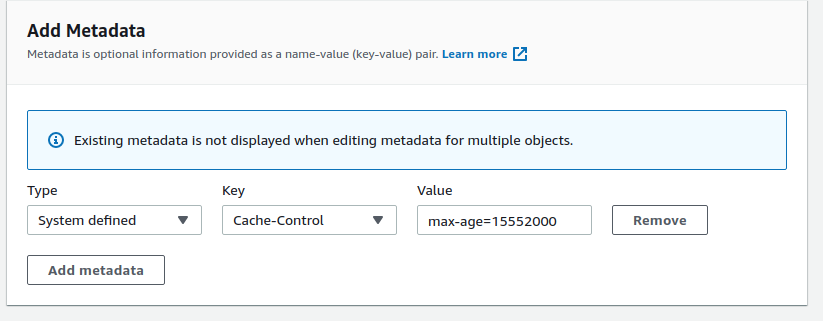
- Type:
System Defined, Key:Cache-Control, Value:max-age=15552000
This is roughly 6 months expiry on all content.
(Optional) Add custom header to S3 and Cloudfront to restrict access to S3 only though Cloudfront
Since we went with public website hosting option. It does expose our S3 publically. Not neccessarily a bad thing, but it’s best to obscure it so people can’t see it. A simple hack is to send custom header from Cloudfront to S3 and let S3 only show the content if a custom header with secret value is present. This is by no means a perfect solution, but creates a layer of protection regardless.
- Update your S3 Policy to include Condition as below. **Make sure you don’t override your existing “Resource” ARN.
{
    "Version": "2008-10-17",
    "Statement": [
        {
            "Sid": "AllowPublicRead",
            "Effect": "Allow",
            "Principal": {
                "AWS": "*"
            },
            "Action": "s3:GetObject",
            "Resource": "arn:aws:s3:::example.com/*",
            "Condition": {
                "StringLike": {
                    "aws:Referer": "sECretHeadr!"
                }
            }
        }
    ]
}
-
Go to your cloudfront distribution:
-
Select Origins and Origin Groups
-
Select and Edit your origin.
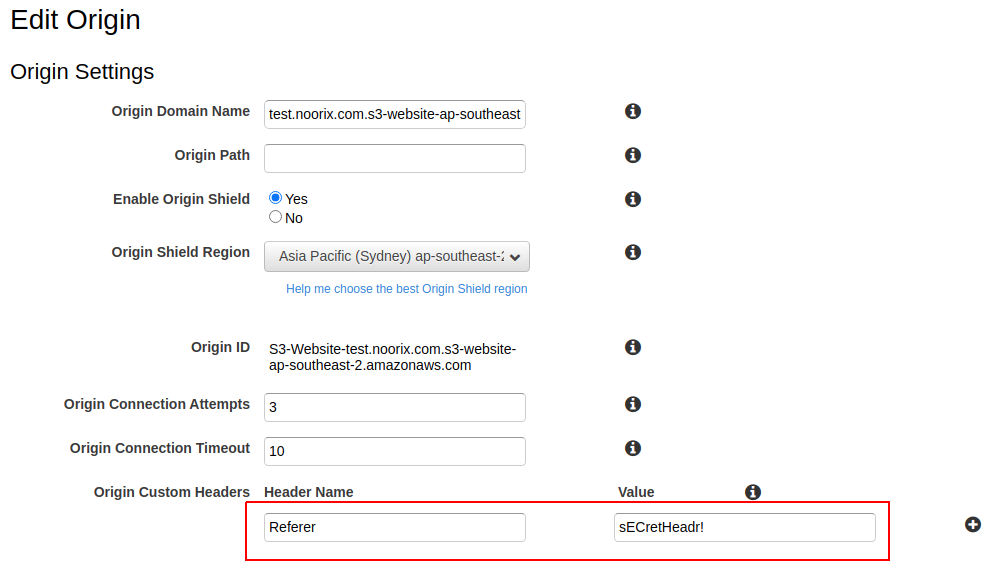
5.Origin Custom Headers:
Header Name: Referer
Value: sECretHeadr! (or whatever you set in the S3 policy)
Try and test using your S3 website endpoint URL now and it should give you forbidden 403 errors. However, your custom domain name will work as it goes through cloudfront, which secretly adds the required header.
Cloudfront Invalidation
If you made changes above, or change files on S3. Cloudfront will not expire it until it’s cache expiry. One way to ensure Cloudfront refreshes it’s cache is to create an invalidation
In your distribution you can go to invalidations tab and craete an invalidation for specific file or path. I normally put * and click “Invalidate” and that takes care of it completely and refreshes the entire distribution.
AWS CLI for easy S3 upload and Cloudfront Cache invalidation
It’s a hassle to remember to save max-age variable and invalidate manually everytime you want to make minor edits or upload your website. Which is why all this is much easier with AWS CLI. I highly recommend you do what I am about to explain as it makes future updates in seconds and mistake free.
Once logged in to AWS Console, now open services menu and open IAM console. We need to create a user with progammatic access, do make things faster and easier, especially for redeploying websites after changes.
- Go to Users
- Click Add User
- Create a user name:
apiuser(or any other name you prefer) - Check Access Type:
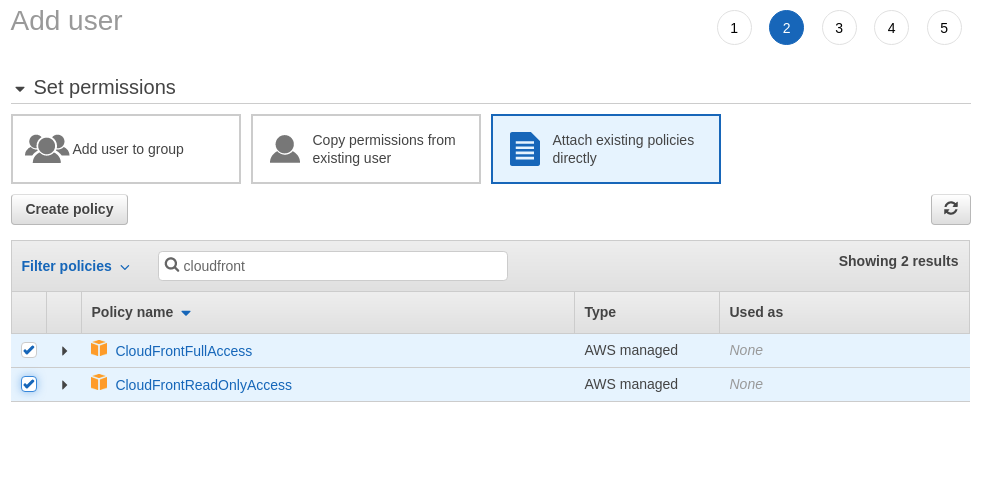
Programmatic access - Click
Attach existing policies - Add selective policies:
AmazonS3FullAccess, CloudFrontFullAccess
- Click Next: tags, and set tags if you know what you are doing, or ignore and click Next: Review
- Finally,
Create User
At this point it will show you two important items:
Access Key ID and Secret Access Key. You can either download it as CSV or copy paste it somewhere. But do copy it, I don’t believe you can access secret access key again. You will have to generate new if you navigate away.
Download and install AWS CLI
Once installed, configure it:
aws configure
Sample configuration prompts. You need to put your own access key, secret key and region here. TIP: Region names are accessible when you are in the console on top right drop down menu next to your name and Support.
$ aws configure
AWS Access Key ID [None]: AKIAIOSFODNN7EXAMPLE
AWS Secret Access Key [None]: wJalrXUtnFEMI/K7MDENG/bPxRfiCYEXAMPLEKEY
Default region name [None]: ap-southeast-2
Default output format [None]:
Next, if you make changes to your website. Just generate a new static website, and run these commands to replace your website on S3, set the cache header while you are doing it and create an invalidation in cloudfront to refresh the site.
You might want to save this in a deployment.txt in your project directory of your static site. Or script the commands. Note the distribution-id is unique to the distribution you created and must copy it exactly.
cd public
aws s3 sync . s3://example.com/ --delete --cache-control max-age=31536000
aws cloudfront create-invalidation --distribution-id E1PCXXXRUR1BH --paths "/*"
That’s it, this helps you deploy your site within seconds
I hope this was a good learning experience, especially if you followed through my Hugo & Bootstrap series . If you have any suggestions for improvemnt, please do send me comments via contact form above and don’t forget to link us on your blog or website.