
A great way to start hosting wordpress is AWS Lightsail. One of my favourite hosting service as it gives multiple geographic regions to host, it’s cheap, robust AWS architecture that allows expanding and upgrading easy!
This post is NOT for absolute beginners, I would assume you have a basic understanding of Linux command shell and are able to manage hosting as a power user, otherwise I highly recommend hosting on a “managed” platform.
One of the gripes with AWS lightsail hosting is it comes with a vanilla bitnami application. It’s great, but you have to still go about setting up basics like OS patching (and automating it). WordPress, essential plugs and hardening and ensuring email works.
First time setup:
As soon as you launch a bitnami instance on AWS, here are a few things you can do right from start. My preference is paste this in the “Add launch script” section:
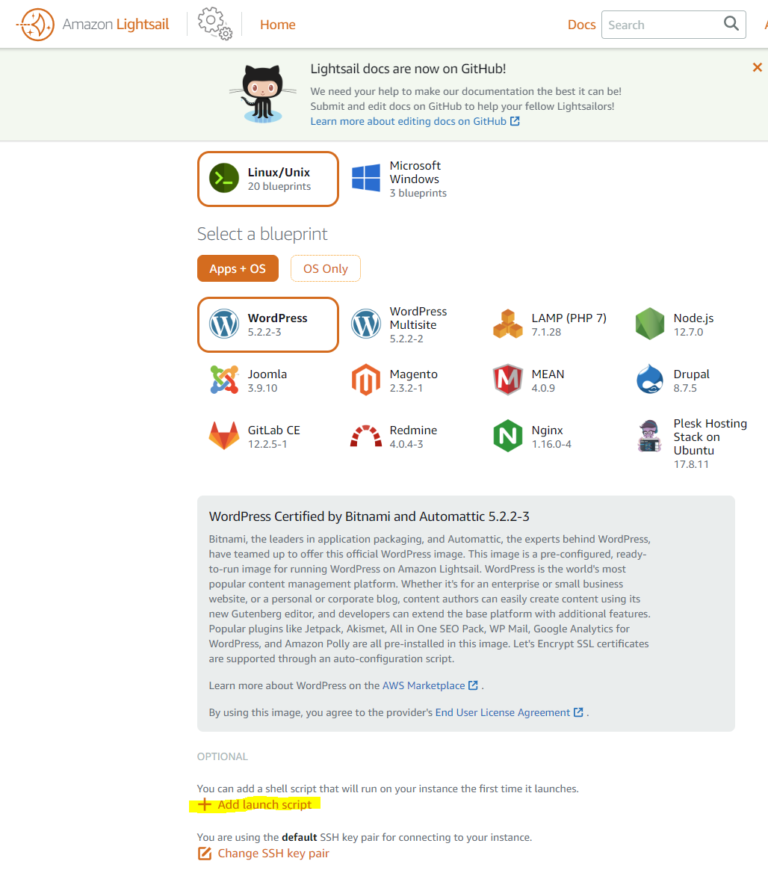
sudo /opt/bitnami/apps/wordpress/bnconfig --disable_banner 1
sudo DEBIAN_FRONTEND=noninteractive apt-get -y dist-upgrade
sudo DEBIAN_FRONTEND=noninteractive apt -y install unattended-upgrades
sudo timedatectl set-timezone Australia/Sydney
sudo reboot
This would inevitably delay your instance startup by ~3-5 minutes, as it runs those patches, disables the annoying bitnami banner, sets up the right timezone, install python and AWS command line tool which we will get later to and does a reboot. Note the timezone I have set is Australia/Sydney, you may want to update it to your specific country/city
If you forget to do this on launch script, don’t stress, you can always run these manually from the shell after your instance is up.
Getting started with WordPress:
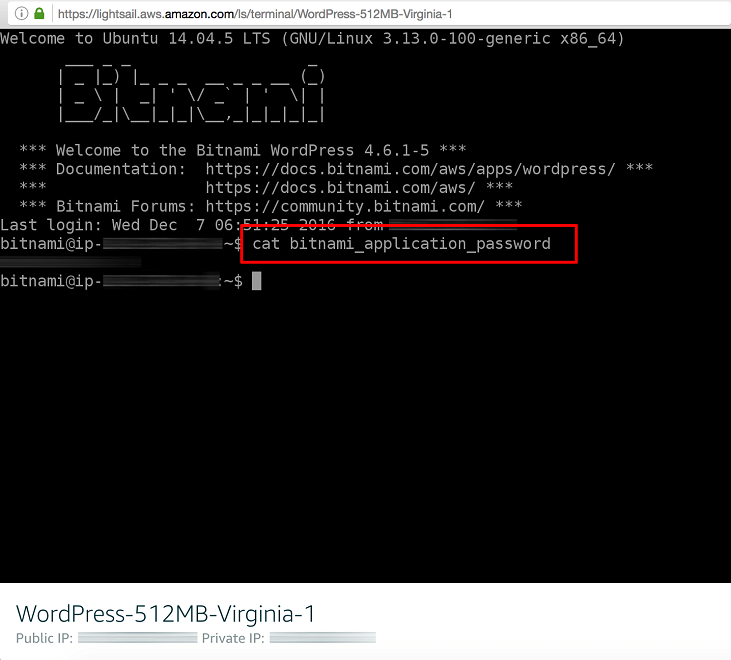
Once your instance starts and you get on the shell access from AWS Lightsail page. Needless to say, you need assign a static IP
Your password for wordpress is sitting in plain text in home directory, we need to change that. Once you have that, you can login to your site by entering youripaddress/wp-admin and using default username “user” and password in the file you just copied.
- Create a new wordpress admin account and don’t name it “admin”. That’s the most common user and get’s brute forced
- Logout and login as the new user you just created
- Delete the default “user” as you no longer need.
Now might be a good time to remove the unwanted plugins, which is most of them on your site.
My personal preference is adding these two plugins which are free and work for me, of course you can choose many others freely available.
2FAS light – This enables google or app based authentication on your site as a secondary fail-safe should your admin password be compromised.
All in One WP Security & Firewall – This is an all rounder free plugin that allows you to limit logins, spam protection on blogs, change default admin URL, permissions on WordPress folders/files and a lot more. It’s straightforward once you install it and set the security one by one.
WARNING: The firewall rules and many settings in this plugin donot work as they rely on modifying .htaccess file. Bitnami stack has a different way of picking up apache config and there are ways to include the .htaccess file but I have noticed a few issues if you enable too many options. I will update this section when I have more info. However, you can still use the plugin for database security, file monitoring and permissions, login limit etc.
Securing Ubuntu by automating patches:
Now that we have a running instance on a patched up website, let’s start the security automation
You will want to have unattended patch management on your hosting. I would not recommend this on very sensitive transnational sites as there is a small chance it can crash it if say a patch goes wrong. But I have rarely seen that happen.
If you ran the initial script earlier, you have the unattended upgrades package installed already.
sudo nano /etc/apt/apt.conf.d/50unattended-upgrades
Remove comments on the “updates” line by deleting the two slashes at the beginning of it:
“${distro_id}:${distro_codename}-updates”;
Optional: You should remove comments and adapt the following lines to ensure you’ll be notified if an error happens:
Unattended-Upgrade::Mail “user@example.com”;
Unattended-Upgrade::MailOnlyOnError “true”;
Recommended: remove unused kernel packages and dependencies and make sure the system automatically reboots if needed by removing comments and adapting the following lines:
Unattended-Upgrade::Remove-Unused-Kernel-Packages "true";
Ensure there is a semicolon at the end of this line.
Unattended-Upgrade::Remove-Unused-Dependencies "true";
Unattended-Upgrade::Automatic-Reboot "true";
Unattended-Upgrade::Automatic-Reboot-Time "02:00";
Next, enable automatic updates and set up update intervals by running: sudo nano /etc/apt/apt.conf.d/20auto-upgrades
In most cases, the file will be empty. Copy and paste the following lines:
APT::Periodic::Update-Package-Lists "1";
APT::Periodic::Download-Upgradeable-Packages "1";
APT::Periodic::AutocleanInterval "7";
APT::Periodic::Unattended-Upgrade "1";
The time interval is specified in days, feel free to change the values. Save changes and exit.
You can see if the auto-upgrades work by launching a dry run:
sudo unattended-upgrades --dry-run --debug
If all goes well, congratulations a big part of your security management is automated.
Apache Mod_Evasive (optional)
mod_evasive is a module specifically designed to prevent Distributed Denial of Service attack on your website. Follow the official bitnami guide here to install it. Personally, I found it more troublesome as you really need to tweak it. If your site is expecting large traffic or attacks, then it might be worth considering adding AWS WAF to your site.
Fix Email
The default AWS instance doesn’t send email, in fact AWS blocks outgoing SMTP on port 25. I am not 100% sure but could never make email delivery directly from the server easy enough. The risk is also high of your server generating emails and getting IP or domain getting blacklisted if it goes over a certain threshold. Safer options are to configure Postfix in Ubuntu to use Gmail, O365 or AWS mail servers to send email. You can use the WordPress plugin WP Mail SMTP to configure it. I believe this comes installed in default Bitnami WordPress instance and tells you that Bitnami and AWS prefer it this way. There are two ways to go about configuring your email.
SMTP Relay – Harder but more flexible
If you have GSuite or O365 and mapped to your domain for email. I highly recommend doing this as it will let you safely send emails which are signed using default DKIM in case you haven’t set your own. The only catch is they are usually limited to 2000 emails a day which quite high for normal day to day enquiries and administrative notifications.
First step to enable SMTP relay. If you have GSuite, these instructions are spot on and easy to follow. O365 is tricky, they don’t call it SMTP relay like everyone else and make it convoluted mail connectors and flows etc. However, it can be achieved using option 3 on this page.
Really for everything else, do some research online to find out if can SMTP relay using your email provider, fundamentally you are allowing your webserver IP to be allowed to send emails on behalf of your domain through the SMTP relay provider (or smarthost).
Now to actually setup the mail client on Linux. My preference is to setup Postfix, it’s easier and more secure, also more robust than sendmail. This lets yourr server send email from command line tools such as mail or sendmail (for postfix) and most of the scripts can then use it such as Fail2ban, unattended updates or any operating system alert going to your account.
This article is quite help you configure Postfix using SMTP relay a.k.a SMARTHOST.
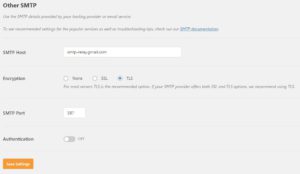
Once this is setup and tested, you can configure WP Mail SMTP to configure the address of your relay server (see below). In this case it’s GSuite’s relay server. Note that authentication is turned off, you can configure any FROM address of your domain which is more flexible then the next and easier approach which limits to the logged in account.
Authenticated SMTP – Easier
The easier approach is not essentially skips setting up SMTP relay process. Also this is your only option if you are relying on free gmail or outlook.com service. The limitation of this one is it literally uses your Gmail, Outlook or whatever free service you have and from emails, and thereby the from address is forced as your personal gmail/outlook address. I have tried to force from address to be different, but then it doesn’t work or ends up gmail not accepting email. The limitation of not be able to use info@yourdomain.com as from address can be undesirable if your website is generating emails for customers, but alright if there is a contact form and the emails are all coming to you anyway. In the latter case you don’t care about from address.
Select Other SMTP option in WP SMTP Plugin. Set encryption on and leave the default port for TLS as 587. Turn on authentication and put your email user and password. I highly recommend using App based password instead of your actual gmail password and store it in wp-config.php instead on the form. App based passwords don’t get changed even if you change your gmail password and are not required to provide 2-factor authentication, so great for use cases like these. I think all major email services have app based passwords, so feel free to research and find yorus.
The plugin method fixes wordpress and let’s it send emails. However, if you had setup operating system alerts on automated patching, that would still not work without proper configuration. The process can be longer and here is the guide to setup postfix to send email using your gmail. You can adapt it for outlook or any other email service. You pretty much have to change relay server name.
Automatic Firewall using Fail2Ban
Fail2Ban is a script you can install with custom filters to ban malicious users with a huge range of attacks. It’s quite powerful and primarily using IPChains to block traffic at the operating system level. Some of the filters you can add are to hard block people from trying to brute force into your WordPress or trying to spam your blog. The most common attacks I have seen are people trying to brute force to your wp-login page and SSH to your account. The first one is hard to be successful at after you have installed 2FA and secured your login attempts at application level (within wordpress using All-in-one Security plugin). These annoying attackers are doing nothing but creating a potential security risk and wasting your bandwidth. So lets block them!
Grab the packages. Iptables, I believe is not installed by default and is the Linux firewall that Fail2Ban uses.
sudo apt-get install fail2ban
sudo apt-get install iptables
sudo apt-get install iptables-persistent
Fail2Ban is quite technical and the way it works is it has default files /etc/fail2ban.conf and /etc/fail2ban/jail.conf. Everything you need to do is pretty much in jail.conf area, but we don’t modify that file, instead you create a new file jail.local
jail.local inherits the jail.conf file and override any settings you do here. So settings disabled in the parent jail.conf or set by default can be overwritten here and is the preferred way of doing things. Also within /etc/fail2ban, there is are subfolders jail.d and filter.d This is where you can create individual conf files for services in a clean way such as SSH blocking, wordpress rules etc. We will come to that soon enough.
Configure default /etc/fail2ban/jail.local
sudo nano /etc/fail2ban/jail.local
[DEFAULT]
ignoreip = 127.0.0.1/8 xx.xx.xx.xx
bantime = 86400
findtime = 600
maxretry = 5
destemail = youremail@domain.com
sender = webmaster@domain.com
sendername = Fail2Ban
mta = sendmail
action = %(action_mwl)s
[sshd]
enabled = true
The first setting ignoreip, put your server’s public in xx.xx.xx.xx. This prevents you being locked out or being detected for any misuse.
bantime is time in seconds to block an IP by default for misuse, I try to keep it at 86400, so one day of block. 0 will block forever, but you don’t want your firewall to grow with too many IPs being added over time. Most attackers when they get blocked will stop trying and move on, so better keep a shorter block time and not make your firewall heavy. findtime and maxretry are used to detect abuse in time frame. So example above means 5 tries allowed in 5 minutes time window. If that exceeds, block the user. So in this case, someone is trying to SSH after 5 incorrect attempts, you block them so they can’t reach the server entirely.
Next options, destmail, sender, sendername and mta are simple enough. Sender address to use for notifications by Fail2Ban. mta = sendmail means utility it will use. It does not mean you need to install sendmail package on the server. Postfix and mailutils package includes sendmail command that uses postfix, for compatibility.
The email settings wont’ work and are useless if you have NOT setup and tested email for the operating system. See section above Fix Email.
The most interesting one is action. You can see all of the options in /etc/fail2ban/jail.config file. The config above means, when it bans an IP, it will send an email to destemail with relevant log files and whois report of IP. It’s fun at first, but soon after you start trusting Fail2Ban, You can change the action parameter to action = %(action_)s which means, just block and don’t bother me. Here are some other options to try:
The simplest action to take: ban only
action = %(action_)s
ban & send an e-mail with whois report to the destemail:
action = %(action_mw)s
ban & send an e-mail with whois report and relevant log lines:
action = %(action_mwl)s
ban & send a xarf e-mail to abuse contact of IP address and include relevant log lines:
action = %(action_xarf)s
ban IP on CloudFlare & send an e-mail with whois report and relevant log lines to destemail:
action = %( action_cf_mwl)s
And a few more… have a look at /etc/fail2ban/jail.conf file for more options, but don’t modify that file. Paste the option in jail.local file.
Last one is a quick SSH service and enabling it to use default services. It does not require much config and it’s filters are built-in.
Hardening wordpress
I feel this part is optional, but if you really must this really is brutal on keeping hackers trying to guess your password.
First off, install WP fail2ban plugin. This is required to enable LOG_AUTH in wordpress so that fail2ban can read it’s logs and apply filters. The free version does the trick and you don’t need to go premium. The author was kind enough to setup some filters and jails specific to wordpress, which I have included below. All credits to the author of the plugin.
Once that’s installed and activated. We will setup two jails and two filters, wordpress soft and wordpress hard. Soft fails are for correct user name but incorrect logins. Hard fail to instantly block an IP who comes with an incorrect user name, quite often the generic admin user. You would be exempted if your IP is in ignore list. Try not to keep a very long bantime as you can make mistake like accessing over a different PC or your public IP changing after a router reboot at home and putting in incorrect login. However, there is a way to unban an IP manually, I will put that down at the bottom of the section.
Create two files:
sudo nano /etc/fail2ban/jail.d/wordpress-hard.conf
[wordpress-hard]
enabled = true
filter = wordpress-hard
logpath = /var/log/auth.log
findtime = 10800
bantime = 90000
maxretry = 1
port = http,https
sudo nano /etc/fail2ban/jail.d/wordpress-soft.conf
[wordpress-soft]
enabled = true
filter = wordpress-soft
logpath = /var/log/auth.log
maxretry = 5
findtime = 10800
bantime = 86400
port = http,https
Feel free to experiment with findtime, bantime which you are overriding here from the default jail.local file for these specific services. If you remove one of these lines it will inherit the default value from jail.local.
Add the filters corresponding to these jails:
sudo /etc/fail2ban/filter.d/wordpress-hard.conf
[INCLUDES]
before = common.conf
[Definition]
_daemon = (?:wordpress|wp)
failregex = ^%(__prefix_line)sAuthentication attempt for unknown user .* from <HOST>$
^%(__prefix_line)sREST authentication attempt for unknown user .* from <HOST>$
^%(__prefix_line)sXML-RPC authentication attempt for unknown user .* from <HOST>$
^%(__prefix_line)sSpam comment \d+ from <HOST>$
^%(__prefix_line)sBlocked user enumeration attempt from <HOST>$
^%(__prefix_line)sBlocked authentication attempt for .* from <HOST>$
^%(__prefix_line)sXML-RPC multicall authentication failure from <HOST>$
^%(__prefix_line)sPingback error .* generated from <HOST>$
ignoreregex =
# DEV Notes:
# Requires the 'WP fail2ban' plugin:
# https://wp-fail2ban.com/
# Author: Charles Lecklider
Then for the soft version
sudo nano /etc/fail2ban/filter.d/wordpres-soft.conf
# Fail2Ban filter for WordPress soft failures
[INCLUDES]
before = common.conf
[Definition]
_daemon = (?:wordpress|wp)
failregex = ^%(__prefix_line)sAuthentication failure for .* from <HOST>$
^%(__prefix_line)sREST authentication failure for .* from <HOST>$
^%(__prefix_line)sXML-RPC authentication failure for .* from <HOST>$
ignoreregex =
# DEV Notes:
# Requires the 'WP fail2ban' plugin:
# https://wp-fail2ban.com/
# Author: Charles Lecklider
Save the file and start fail2ban.
sudo service fail2ban restart
Check /var/log/fail2ban.log for errors just to be sure. The log file is a good place to see if fail2ban is actually working.
You can check the status of fail2ban and number of jails active by running the following. It should show 2 which are your wordpress ones, SSH is enabled in main config so should not appear here. However, if you are getting the hang of it, you can configure more advanced options by googling fail2ban filters and jails. I experimented a bit on DDOS attacks, but have created more trouble than benefit, maybe something I will leave for another blog.
fail2ban-client status
Unbanning IP manually
If in the not so unlikely event you block yourself or an IP by mistake, you can recover yourself by logging in the shell using AWS console and running this command:
sudo fail2ban-client set wordpress-hard unbanip xx.xx.xx.xx
You can make out wordpress-hard or wordpress-soft, sshd whatever the filter is that’s blocking you, Or Just disable the fail2ban service until you troubleshoot.
Now sit back and enjoy as your server makes those kill shots and sends you a satisfying email.
Conclusion
If you followed everything so far, you should have completed a basic setup of WordPress with essential security. There are more measure you can take like installing commercial plugins that involve malware protection and firewalls, but I feel that’s a different topic and not specific to AWS Lightsail.
Next step: [Speed up your website performance]({{< relref “optimise-speed-for-technical-seo-on-aws-wordpress-hosting.md” >}})
If you found this useful, feel free share this page on your social media or back link us through your website. It reallys helps us grow and increases the outreach of our blogs.