

This article is a continuation of my previous article on building static website with Hugo and Bootstrap. We will cover more advanced functionality such as building blogs, pages, menu, structured metadata (JSON/LD) and add google analytics to your site. I will also leave some other pointers for you to explore on your own.
Building content pages, blogs and configure JSON/LD Schemas on Hugo
Please make sure you have gone through Part 1 & Part 2 for background and pre-reqs.
Hugo Templates
Here is a crash course on Hugo templates. There are two types of Hugo page templates:
- List templates
- Single templates
The home page is considered list template, other pages that usually a collection of other pages, such as taxonomy or category pages on a blog are also shown as list templates. Example somesite.com/blogs or somesite.com/blogs/categories/general would be list templates. These are auto-generated urls when you build taxonomy or catagories later.
These template are fundamental in letting you design the page layout, columns, headers or styles and then the main block is where your content can be injected. If you were importing an existing bootstrap theme, it would you would putting bulk of the theme content in these templates.
Hugo lookups your theme/layouts folder first, followed by the basedir/layouts folder. If you put layouts/_defaults/list.html in theme folder, that will be used, but if you put another list.html in the basedir/layouts folder, it will override the theme. So for simplicity’s sake, we will always use the templates in theme/layouts in basedir of the project, except for the home page, which is index.html. You can have this index.html in theme/layouts, but since it’s not style related in most cases has content (not theme), I feel structurally, it needs to be outside theme and inside /layouts
More on layouts and lookup order on Hugo Doc.
Also we learned, that a index.html overrides the default list.html as the home page. We already have one in our project with the jumbotron and some sample content.
Other files that we used so far was, baseof.html. This is the grandparent file. It’s the first file that Hugo parses for content and builds your site. Ours has the content:
<!DOCTYPE html>
<html>
    {{- partial "head.html" . -}}
    <body>
        {{- partial "header.html" . -}}
        <div id="content">
        {{- block "main" . }}{{- end }}
        </div>
        {{- partial "footer.html" . -}}
    </body>
</html>
So it calls another type of template called partials. Partials are html files you can include for header and footer like above and are stored in layouts/partials folder. Partials are used for repeatable content accross your site, but only within layout files (index.html, single.html, list.html, baseof.html). Say a contact form or banner you want to show on each page. This helps you to modify content in partial it automatically updates on each page fo the site. Partials are awesome and you will definitely want to use them sparingly.
Another useful feature is shortcodes. We will use it in our services page.
Within layouts folder, you can create subfolders and that can ovveride template for a folder. For example, if you create mytheme/layouts/blog/single.html, that will only be invoked for pages inside /blogs/ folder and correspondingly URL (ex: mysite.com/blogs/my-first-blog.html). However, pages outside that folder (ex: mysite.com/aboutus.html ) will use mytheme/layouts/single.html template.
Update Single Page template
Edit mytheme/layouts/_default/single.html and replace the content below:
{{ define "main" }}

<div class="container pb-5">
  {{ .Content }}
</div>

{{ end }}
We are directing Hugo that our page content is wrapped with a container div and to inject our page inside {{ .Content }} placeholder.
Storing static images and files
Static files in Hugo can be stored mytheme/static or /static folder (which takes precedence). In my case I use both, mytheme/static/images and mytheme/static/icons for theme only icons and images. For actual images and content such as blog images, pdfs or downloadables, I use the /static folder as it seems logically correct. Hugo will lookup a static resource such as jpg file or .pdf file first in mytheme/static/path-to-file and if not found, in your /static/path-to-file. If neither is found, you will get a 404.
Front matter
Hugo has page meta data in front matter . Which are essentially variables on a page that can invoked inside the content. Such as Date or LastModified, Author etc.
Example front-matter: (We will later use something like this for our blogs)
---
title: "{{ replace .Name "-" " " | title }}"
draft: true
featuredImage:
categories: ["General", "Technology", "Products"]
keywords: ["hugo", "static","bootstrap"]
author: "Murtaza Nooruddin"
authorProfile: "https://www.linkedin.com/in/mnooruddin"
---
In example, above these can be dynamically used inside the page or blog to build other content elements or links without hardcoding data. Front matter is extremely important and I suggest you go through the Hugo documentation to learn more.
Archetypes
Archetypes are content templates and commonly used for different page types or directory level templates. Unlike single.html template, which defines the layout, these are inside the main block. Which means they generate sample content of a page when you use the Hugo command to create a page. This is very useful, usually to automate front matter for different page types.
We will build a very basic one for our site, create mytheme/archetypes/default.html
---
title: "{{ replace .Name "-" " " | title }}"
draft: false
menu:
  main:
    identifier: "{{ lower (replace .Name "-" "")  }}"
    weight: 100
    parent: ""
---

<h1> {{ .Name }} </h1>
Note we have created front matter within the — headers using YAML. If youo use JSON or TOML the separator and formats are different. See docs on front-matter for more information .
This will tell Hugo to put this content within every html file we create. I have put draft: false, instead of the default true. Keep it true, if you are running Hugo directly on your production server. This setting tells Hugo to build your static site with (true) or without (false) this page.
menu is added as we will use later to construct a nest menu. This is pretty much a basic adaptation of Hugo Docs, but there are other ways of exploring menus, If you prefer you can explore the official method on Hugo docs.
Adding Pages
Now lets add your first page (other than the home page we have already built ofcourse)
hugo new aboutus.html
This will add expected add a new page. Note a new file is generated in /content/aboutus.html. Inside the file, you will see front matter already loaded. See how the archetype we created earlier has been applied automatically and processed?
The page title appears as “aboutus”, feel free to change it to “About Us”, so its more readable.
Add 1 in menu code. Add some sample content after the front-matter.
Your file should look like this after the edits:
---
title: "Aboutus"
draft: false
menu:
  main:
    identifier: "aboutus"
    weight: 100
    parent: ""
---

<h1> aboutus </h1>
Go ahead and test your page at http://localhost:1313/aboutus/
Note the URL is automatically constructued with slug aboutus without the annoying .html extension.
Similarly add another page, feel free to adapt names to your requirements:
hugo new contactus.html
Open the file and set weight to 400. I will explain weights later.
hugo new services/catering.html
hugo new services/hospitality.html
hugo new services/travel.html
hugo new services/conferences.html
Now we have created a nested structure. Hugo will create a content/services folder and create these files within it. As you may have guessed we will have a Services menu item with drop downs.
Open catering and modify weight and parent:
---
title: "Catering"
draft: false
menu:
  main:
    identifier: "catering"
    weight: 210
    parent: "services"
---

<h1> catering </h1>
Do this for hospitality, travel and conferences files. Make sure to increment weight by a 10. So hospitality.html would have weight 220, and so forth. Weights just let us sort the menu in order we want. It’s good practice to start with 100, 200 increments or 10 or 20 increments as it lets you inject new items later without reordering and modifying all the files. Say you want to add another page with menu item before Home and About us later, you simply give it value 50.
Build a Nested Bootstrap menu using Hugo Template
Now that we have a bunch of pages, lets build a main menu to navigate accross our pages. Note you can create multiple menus, eg. footer, sidebars.
Edit mytheme/layouts/partials/header.html and replace content with code below.
<div class="jumbotron text-center">
  <h1 class="display-4">Hello, world!</h1>
  <p class="lead">This is a simple hero unit, a simple jumbotron-style component for calling extra attention to featured
    content or information.</p>

  <div class="d-flex justify-content-center">
    <nav class="navbar navbar-expand-lg navbar-light bg-light">

      <div class="collapse navbar-collapse" id="navbarNavAltMarkup">
        <ul class="navbar-nav">

          <li class="nav-item">
            <a class="nav-link {{ if .IsHome }} active {{ end }} " href="{{ .Site.Home.Permalink }}">Home</a>
          </li>

          {{ $currentPage := . }}

          {{ range .Site.Menus.main.ByWeight }}

            {{ if .HasChildren }}
              <li class="nav-item dropdown">
                <a class='nav-link dropdown-toggle  {{ if or ($currentPage.IsMenuCurrent "main" .) ($currentPage.HasMenuCurrent "main" .) }} active {{ end }}' href="#"
                  id="navbarDropdownMenuLink" role="button" data-bs-toggle="dropdown" aria-expanded="false">
                   {{ .Title }}
                </a>

                 <ul class="dropdown-menu" aria-labelledby="navbarDropdownMenuLink">
                  {{ range .Children }}
                    <li>
                      <a class='dropdown-item  {{ if or ($currentPage.IsMenuCurrent "main" .) ($currentPage.HasMenuCurrent "main" .) }} active {{ end }}' href="{{ .URL }}">  {{ .Title }}</a>
                    </li>
                  {{ end }}
                </ul>
              </li>

            {{ else }}
            <li class="nav-item">
              <a class='nav-link {{ if or ($currentPage.IsMenuCurrent "main" .) ($currentPage.HasMenuCurrent "main" .) }} active {{ end }}'
                href="{{ absURL .URL }}">
                 {{ .Title }}
              </a>
            </li>
            {{ end }}

          {{ end }}

        </ul>
      </div>
    </nav>
  </div>
</div>
I have adapted this code form Hugo’s Doc and used Bootstrap 5 styles to create a menu. Take moment to go through this and try to fully understand it. If you want to omit certain pages from appearing in menu, you will have to either remove menu configuration from front matter of those pages, or rename “main” to something else in the front matter of those pages. For example a privacy page, and terms and condition page would be in a footer menu, then “main” would become “footer” and you would have to define a menu in footer.html partial.
The code we put up there automatically generates menu for pages on your site. You can if you prefer to just create a static menu if you site is small.
Small caveat here, since /services is not a page but a “Section” and uses list template, we will have to tell Hugo to create a menu entry for it. sectionPagesMenu = “main” tells Hugo to generate menu items for Sections… services in our case. However, the page that generates will be added to the end of your menu, if I want it to appear in our desired sequence, then we need to give it weights, which can be given by defining the menu in config.toml. Pay specialy attention to “identifier” it has to be accurately used, else menu’s fail to work.
Open config.toml and the following to the configuration:
  sectionPagesMenu = "main"

  [menu]

    [[menu.main]]
      identifier = "services"
      title = "Services"
      url = "/services/"
      weight = 200
Go ahead and test your site. You should have a working menu structure that loads pages and highlights items based on selected page.
As you see Home is the static menu item, About Us is next with weight 100, Services has weight 200 and child items have been given increments of 200. Then we have Contact Us, which has weight 400. We will add Blogs as weight 300 later on.
A case for Partials
Right now we haven’t linked http://localhost:1313/services page to the menu. But since we have that and it’s empty, lets create some content for it. However, services is not a normal page but a Section (or List template). Furthermore, the list of services then needs to be replicated on home page. This is where Partials or Shortcodes are handy, that let you put repeatable content easily. However, partials can only be used in templates and shortcodes in actual pages or content. This is bit of a struggle with Hugo. In our case, Partials makes sense as both home page and services page are list templates.
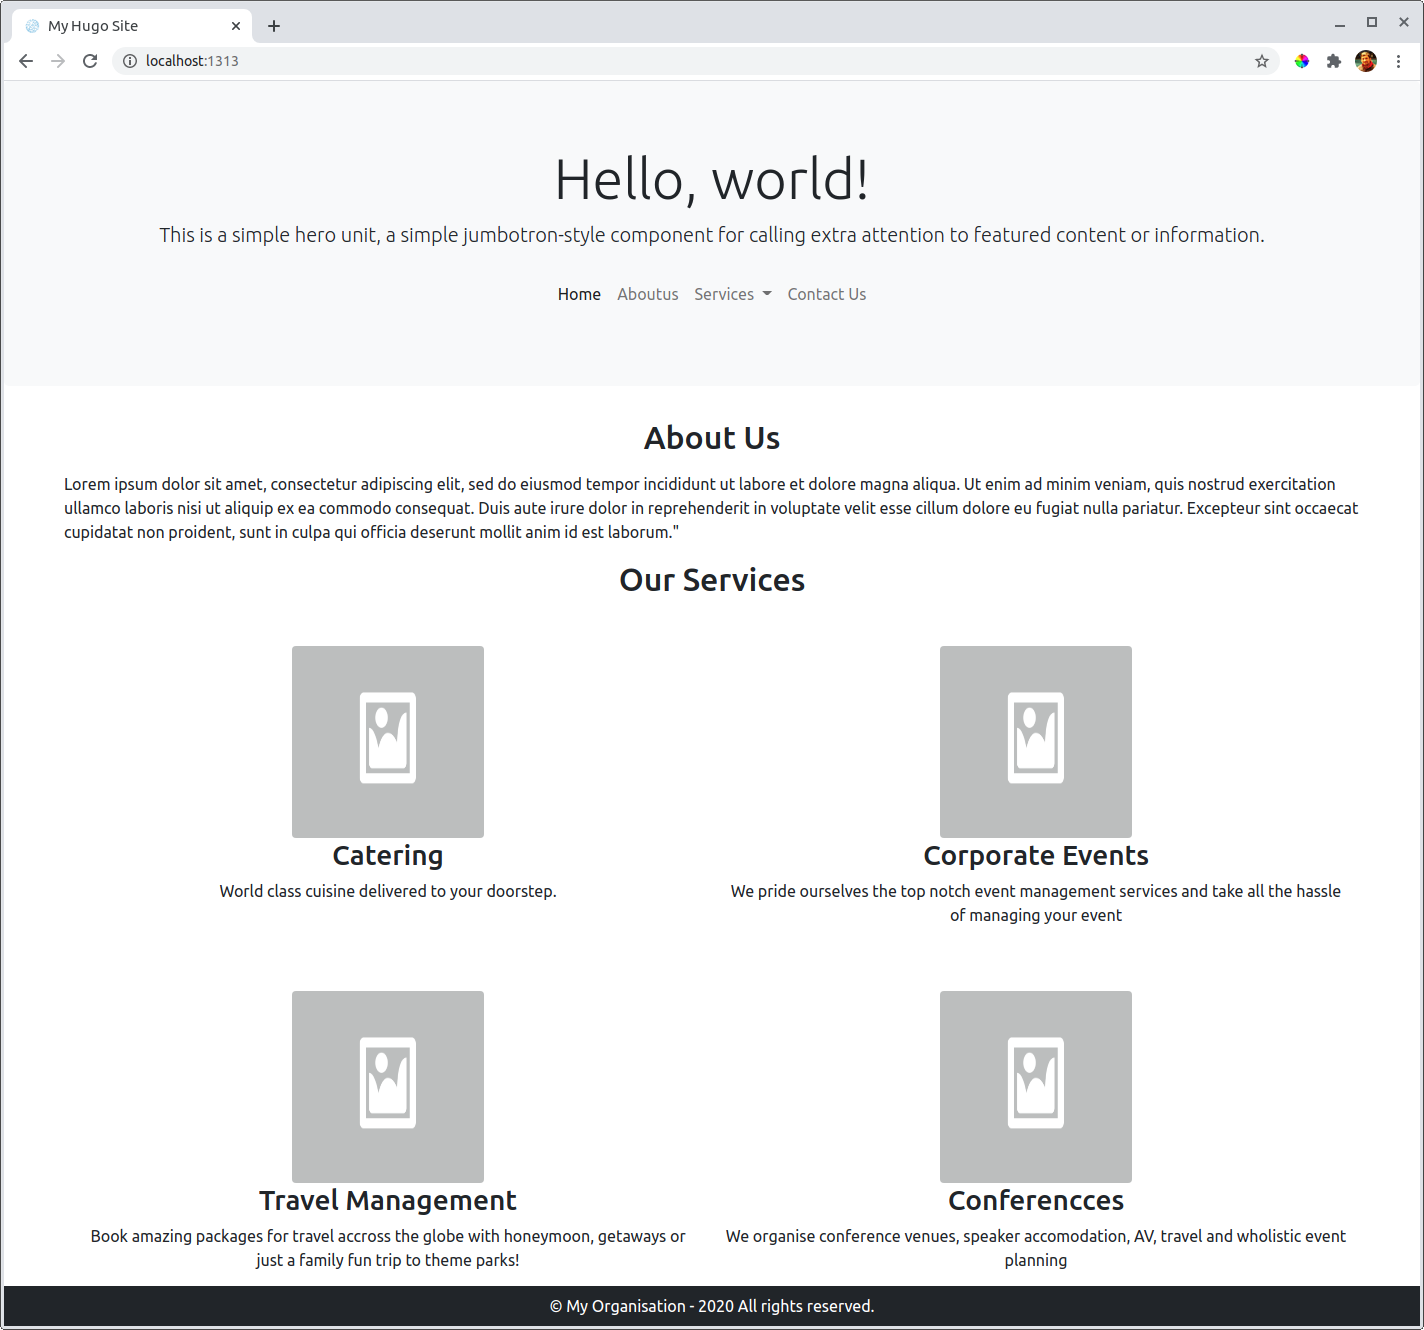
Create a file /layouts/partials/services.html. Here is a sample content for you to try out…
** IMPORTANT** : Note the src=“images/sample.jpg”. You don’t have it, but you can use any image file(s) and put it in /static/images folder. Hugo will pickup static image references from your static folder automatically
<!-- Services section -->
<div class="container overflow-hidden mt-5">
    <div class="row gy-lg-5 gy-sm-4">
        <div class="col-md-6">
            <div class="col gy-3">
                <div class="col-auto mx-auto d-block text-center">
                   <img loading="lazy" height="192px" width="192px" class="rounded" src="images/sample.jpg" alt="Catering">
                </div>
                <div class="col text-center text-lg-left">
                    <h3 > Catering</h3>
                    <p >
                      World class cuisine delivered to your doorstep.
                    </p>
                </div>
            </div>
        </div>

        <div class="col-md-6">
            <div class="col gy-3">
                <div class="col-auto mx-auto d-block text-center">
               <img loading="lazy" height="192px" width="192px" class="rounded" src="images/sample.jpg" alt="Corporate Events">
                </div>
                <div class="col text-center text-lg-left">
                    <h3> Corporate Events</h3>
                    <p >
                        We pride ourselves the top notch event management services and take all the hassle of managing your event
                    </p>
                </div>
            </div>

        </div>


        <div class="col-md-6">
            <div class="col gy-3">
                <div class="col-auto mx-auto d-block text-center">
                   <img loading="lazy" height="192px" width="192px" class="rounded" src="images/sample.jpg" alt="Travel">
                </div>
                <div class="col text-center text-lg-left">
                    <h3 > Travel Management</h3>
                    <p >
                        Book amazing packages for travel across the globe with honeymoon,  getaways or just a family fun trip to theme parks!
                    </p>
                </div>
            </div>
        </div>
        <div class="col-md-6">
            <div class="col gy-3">
                <div class="col-auto mx-auto d-block text-center">
                     <img loading="lazy" height="192px" width="192px" class="rounded" src="images/sample.jpg" alt="Conferences">
                </div>
                <div class="col text-center text-lg-left">
                    <h3 > Conferences</h3>
                    <p >

                       We organise conference venues, speaker accomodation, AV,  travel and wholistic event planning
                    </p>
                </div>
            </div>

        </div>

    </div>
</div>
Next, create a list template in either /mytheme/layouts/services/list.html or /layouts/services/list.html
Put thie following in it:
{{ define "main" }}

<div class="container">

    {{ partial "services" . }}

</div>

{{ end }}
We also want services to appear on home page, so lets invoke the partial there as well:
Open /layouts/index.html
{{ define "main" }}

<div class="container">
  <h2 class="text-center my-3">About Us</h2>

  <p>Lorem ipsum dolor sit amet, consectetur adipiscing elit, sed do eiusmod tempor incididunt ut labore et dolore magna aliqua. Ut enim ad minim veniam, quis nostrud exercitation ullamco laboris nisi ut aliquip ex ea commodo consequat. Duis aute irure dolor in reprehenderit in voluptate velit esse cillum dolore eu fugiat nulla pariatur. Excepteur sint occaecat cupidatat non proident, sunt in culpa qui officia deserunt mollit anim id est laborum."
  </p>

  <h2 class="text-center my-3"> Our Services</h2>

  {{ partial "services" . }}

</div>

{{ end }}
As you can see both / and /services links of your site have the partial embedded.
Your bootstrap themeed site should be up and running. Feel free to make it prettier, adding custom styles, whatever you need.
Blogging with Hugo
Most static websites don’t change much. Which might tempt you to build a simple static website without a static website generator such as Hugo. Save all the hassle of configurations, variables meh meh.
The biggest power of CMS such as wordpress is blogs - dynamic content. However, with static website generators, you can match that power, as it lets you do that, generating categories or tags taxonomy pages for you, updating sitemaps and building blog lists, pagination etc. Wordpress or other blogging tools with an interface, have all of that out of the box, and they are designed for it, but with static, you do get unmatched loading speed and practically unhackable site that you don’t need to worry about.
Lets continue on our project. for blogs, I will prefer markdown content, as it’s easier to type and write. You can choose to have html and just have to rename extensions.
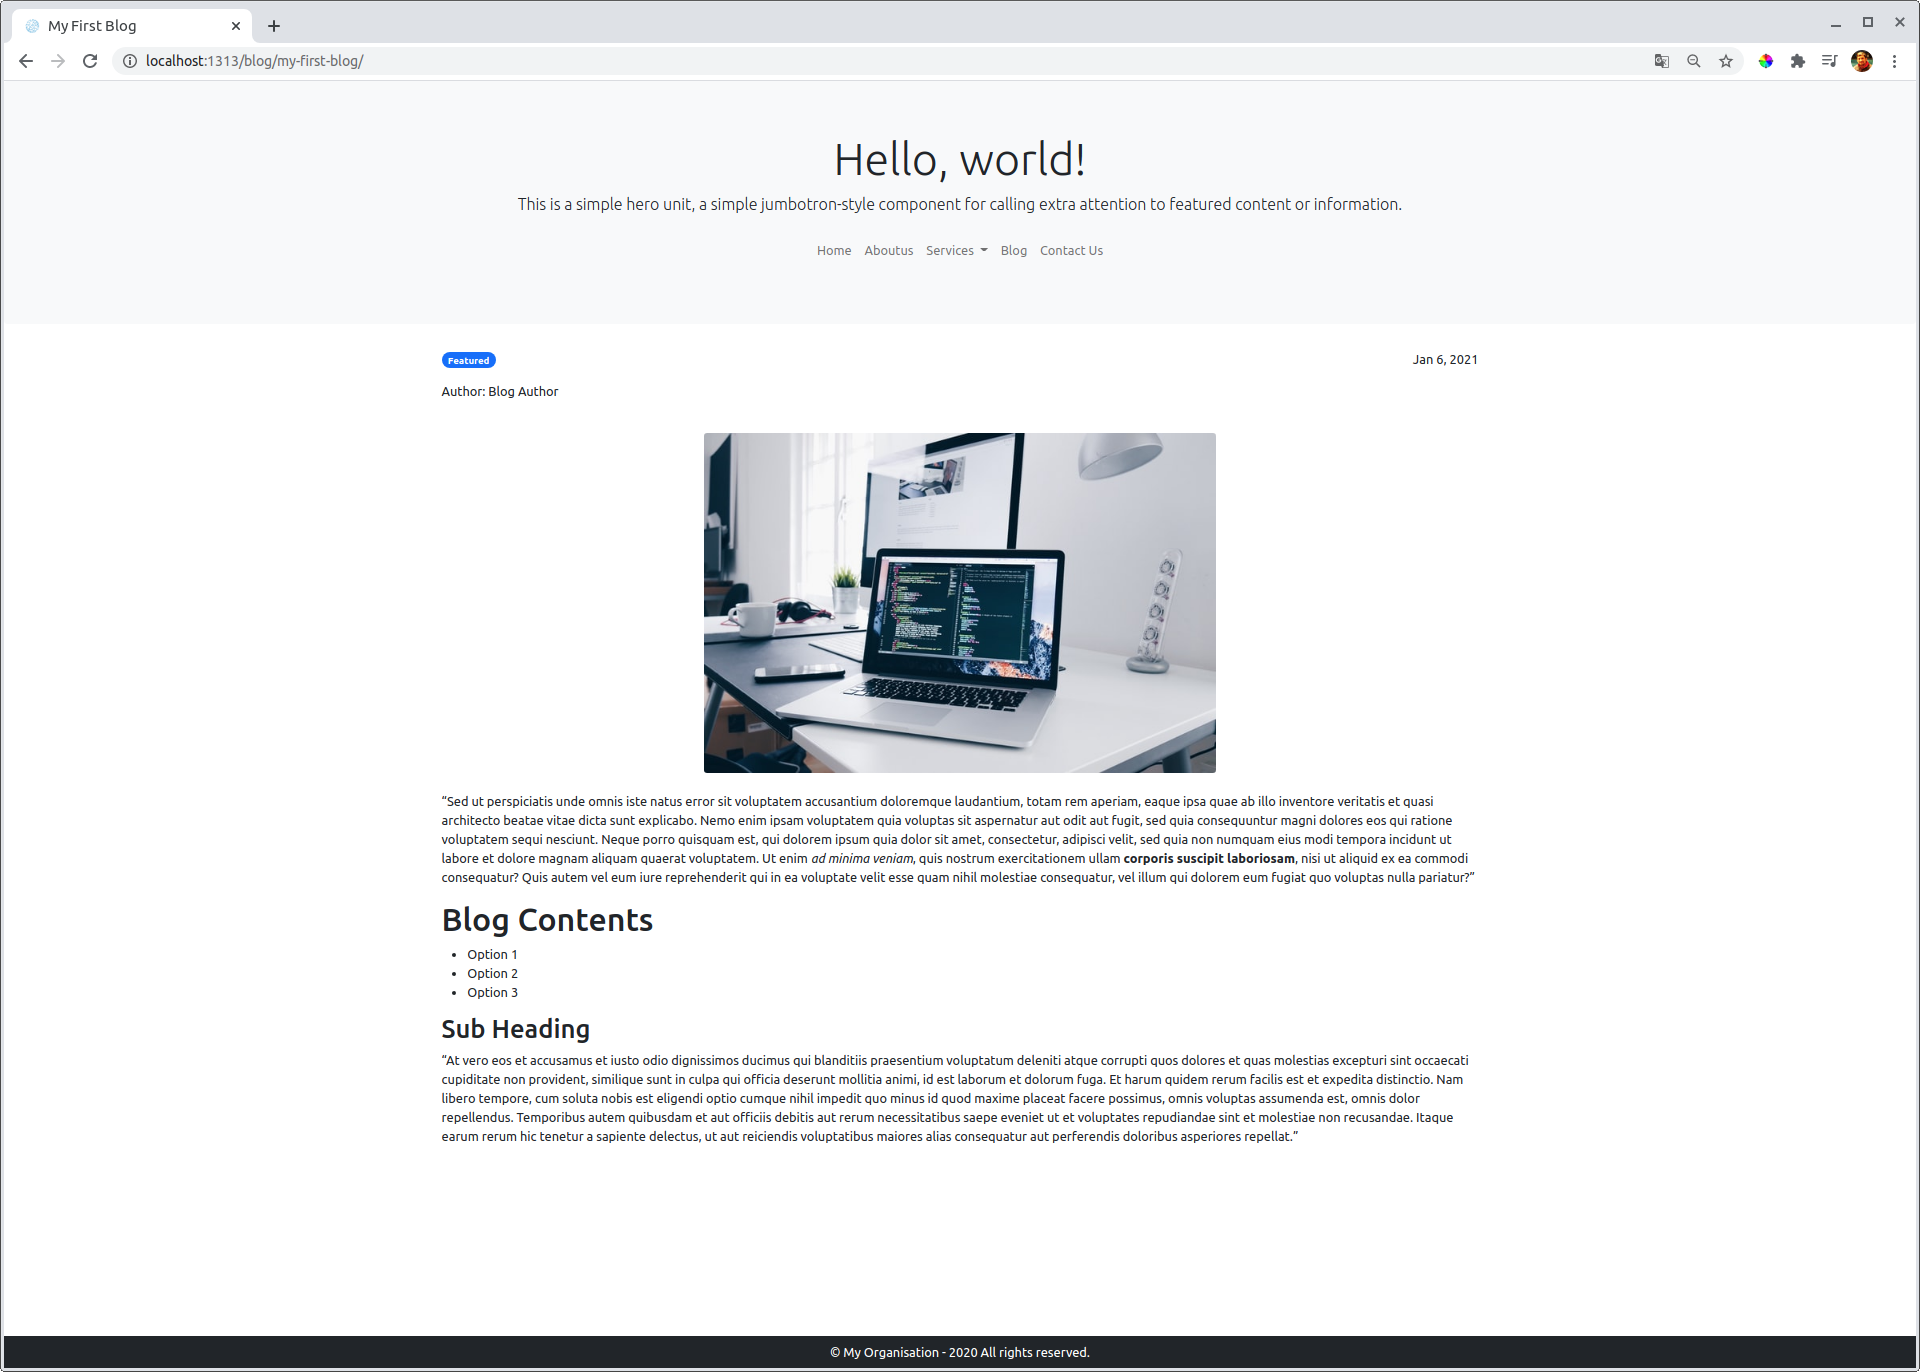
Create archetype file for blog, mytheme/archetypes/blog.md and paste the following, I have taken the liberty of putting some dummy content, so when you create sample blogs, it gives you a better look and feel. This means everytime you create a new blog with .md extension, it will apply this archetype. However, if you want to also create .html files for blogs, you can and add another archetype blog.html.
Also, if you prefer to call blog as article or posts, feel free to modify and replace. But just be cautious.
---
title: "{{ replace .Name "-" " " | title }}"
draft: false
featuredImage:
categories: ["General", "Featured" ]
tags: ["cloud", "static", "fast" ]
keywords: ["hugo", "bootstrap","serverless", "hosting"]
author: "{{ .Site.Params.Author }}"
menu:
  main:
    identifier: "blog"
    weight: 0
    parent: ""
---

"Sed ut perspiciatis unde omnis iste natus error sit voluptatem accusantium doloremque laudantium, totam rem aperiam, eaque ipsa quae ab illo inventore veritatis et quasi architecto beatae vitae dicta sunt explicabo. Nemo enim ipsam voluptatem quia voluptas sit aspernatur aut odit aut fugit, sed quia consequuntur magni dolores eos qui ratione voluptatem sequi nesciunt. Neque porro quisquam est, qui dolorem ipsum quia dolor sit amet, consectetur, adipisci velit, sed quia non numquam eius modi tempora incidunt ut labore et dolore magnam aliquam quaerat voluptatem. Ut enim *ad minima veniam*, quis nostrum exercitationem ullam **corporis suscipit laboriosam**, nisi ut aliquid ex ea commodi consequatur? Quis autem vel eum iure reprehenderit qui in ea voluptate velit esse quam nihil molestiae consequatur, vel illum qui dolorem eum fugiat quo voluptas nulla pariatur?"

# Blog Contents

- Option 1
- Option 2
- Option 3

## Sub Heading

"At vero eos et accusamus et iusto odio dignissimos ducimus qui blanditiis praesentium voluptatum deleniti atque corrupti quos dolores et quas molestias excepturi sint occaecati cupiditate non provident, similique sunt in culpa qui officia deserunt mollitia animi, id est laborum et dolorum fuga. Et harum quidem rerum facilis est et expedita distinctio. Nam libero tempore, cum soluta nobis est eligendi optio cumque nihil impedit quo minus id quod maxime placeat facere possimus, omnis voluptas assumenda est, omnis dolor repellendus. Temporibus autem quibusdam et aut officiis debitis aut rerum necessitatibus saepe eveniet ut et voluptates repudiandae sint et molestiae non recusandae. Itaque earum rerum hic tenetur a sapiente delectus, ut aut reiciendis voluptatibus maiores alias consequatur aut perferendis doloribus asperiores repellat."
You don’t need to modify menu each time you generate content, as we will fix identifier to menu and each blog you navigate to will keep “Blog” highlighted on menu. However, note that we are generating categories and tags. These have been given some default values, but each time you generate, you can modify these according to the content.
Now modify our site’s default list template. Open mytheme/layouts/_default/list.html and lets create a template that lists all blogs neatly. Later on you can modify it according to your need.
{{ define "main" }}
<div class="container pb-5">
<div class="row">
<div class="col-auto">
Categories: {{range ($.Site.GetPage "taxonomyTerm" "categories").Pages }}
<a class="badge rounded-pill bg-primary nav-link" href="{{.Permalink}}">{{.Title}}</a>
{{end}}
</div>
<div class="col-auto">
Tags: {{range ($.Site.GetPage "taxonomyTerm" "tags").Pages }}
<a class="badge rounded-pill bg-success nav-link" href="{{.Permalink}}">{{.Title}}</a>
{{end}}
</div>
</div>
{{ if ne .Kind "taxonomy" }}
{{ range .Pages }}
<div class="row g-4 mt-2 ">
<div class="col-lg-3 col-sm-12">
<img loading="lazy" class="img-fluid rounded" src="{{ .Param `featuredImage` }}" alt="featured image {{.Title }}">
</div>
<div class="col-lg-9 col-sm-12 bg-light p-3">
<a class="text-decoration-none" href="{{ .RelPermalink }}">
<h2 class="h4 ">{{ .Title }}</h2>
</a>
<time datetime="{{ .Lastmod.Format `006-01-02T15:04:05Z07:00` | safeHTML }}">{{ .Lastmod.Format "Jan 2, 2006" }}</time>
<br />
Categories: {{ range .Params.categories }}
<a class="text-decoration-none nav-item px-1" href="/categories/{{ . | urlize}}">{{ . }}</a>
{{end}}
Tags:{{ range .Params.tags }}
<a class="text-decoration-none nav-item px-1" href="/tags/{{ . | urlize}}">{{ . }}</a>
{{end}}
{{ .Content | truncate 400 }}
<a class="text-decoration-none link-secondary nav-link" href="{{.Permalink}}">...Read Article</a>
</div>
</div>
{{ end }}
{{ end }}
</div>
{{ end }}
Next up, open config.toml. We will add params section, auto generated dates and a new menu for blog. For the sake of confusion, I am pasting the entire config.toml so you can simply replace it.
  BaseURL = "https://www.myproductionurl.com/"
  languageCode = "en-us"
  title = "My Hugo Site"
  theme = "mytheme"
  relativeURLS = true

  [params]
    author = "Blog Author"
    description = "This is an awesome Hugo Bootstrap site"

  [module]
    [[module.mounts]]
      source = "node_modules/bootstrap/dist/js/bootstrap.bundle.min.js"
      target = "assets/js/bootstrap.bundle.min.js"

  [frontmatter]
    date = ["date", "publishDate", "lastmod"]
    lastmod = ["lastmod", ":fileModTime", ":default"]

  sectionPagesMenu = "main"

  [menu]

    [[menu.main]]
      identifier = "services"
      title = "Services"
      url = "/services/"
      weight = 200

    [[menu.main]]
      identifier = "blog"
      title = "Blog"
      url = "/blog/"
      weight = 300
Note the [frontmatter] section is added to include two auto-generated date variables in front matter based on last modification of file. This helps us automatically adjust date on the blog whenever you make edits. Menu item for blogs should be self-explanatory. Also note we added [params] to add some custom variables you can use. We will use author to create default author for the blog, which can override in actual page’s front matter.
Later on you will see how [params] can be used for more automation and inject page specific variables such as meta data, structured data (microcodes or json/ld) etc.
Now generate some content:
hugo new blog/my-first-blog.md
hugo new blog/my-second-blog.md
hugo new blog/my-third-blog.md
hugo new blog/my-fourth-blog.md
This will create 4 new blogs as expected. Go ahead and modify the front matter of these by grouping 2 or more with same category and different tags.
Add a few sample images to /static/images folder and link each in one of the blogs as a featuredImage front-matter.
featuredImage: "/images/image3.jpg"
This will give a nice look to the blog list and view it generates.
Take a look at your site:
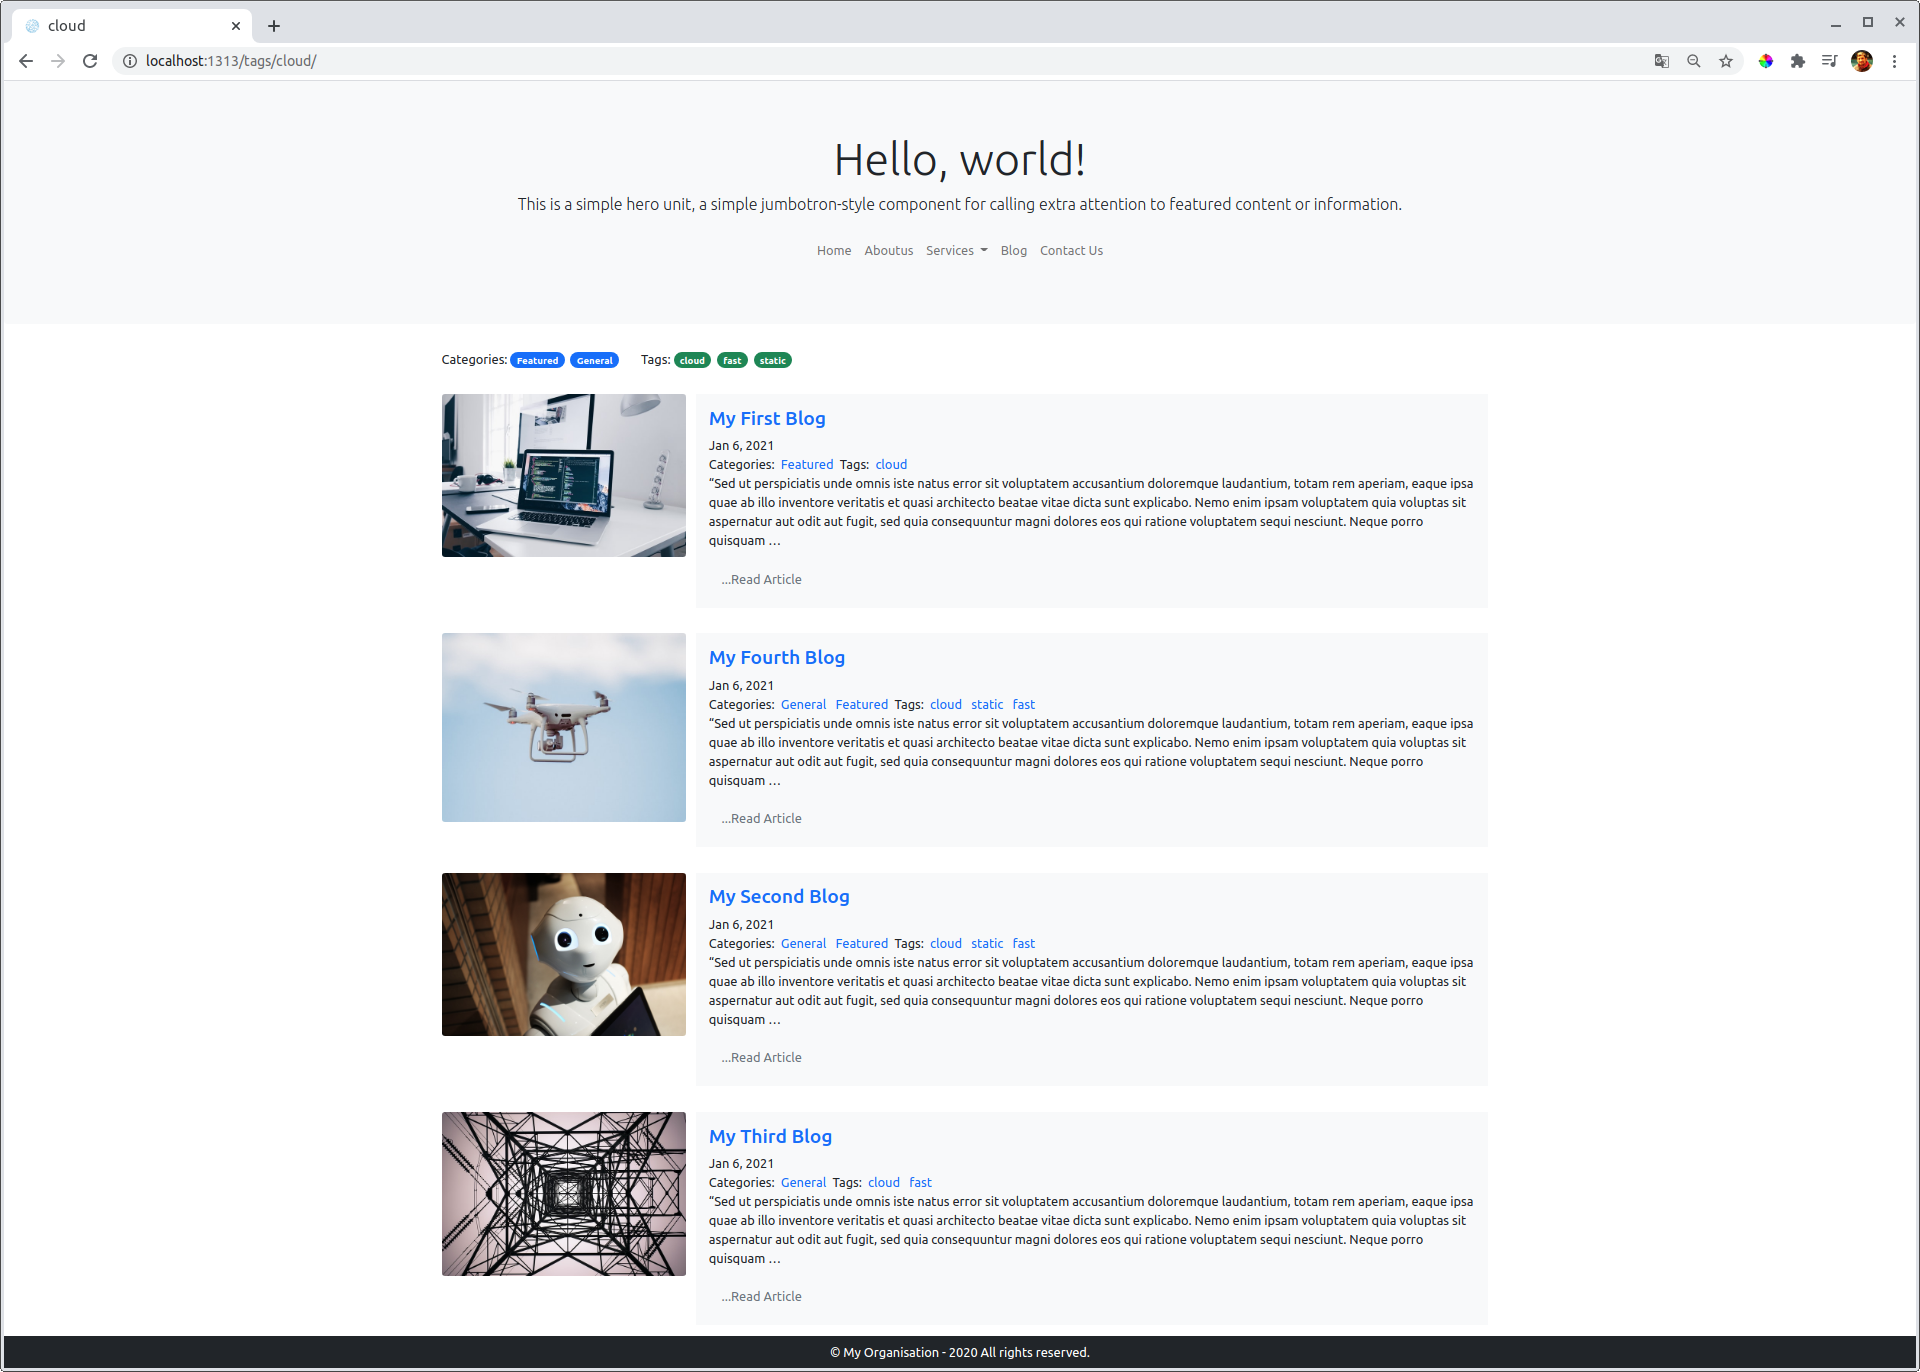
Clearly there is a lot of room for styling and I leave it to you to theme it up. Also note how all the category links, tags automatically work by creating links and list pages. I haven’t covered pagination, but feel free to explore Hugo docs to create pagination of the blog list as they will inevitably grow. I will at some point update this article on how to paginate blog list.
If you are picky about URL management and want blogs/posts to appear by date or certain format, study Hugo’s URL Management to find out how to setup permalinks.
Build your site for production
Now that most of your site is ready, you might want to see how a static output will look like and if anything works?
This is the easist of all things Hugo can do. Just type:
hugo
That’s it!. It generates a public folder, with static site built and ready to be deployed. All the hugo tags, variables and template are replaced with actual HTML code, with css and javascript assembled in one minified file. So clean and so fast. You can upload this on a test/production hosting server. Check my serverless hosting blog, on how to host this on AWS S3 and Cloudfront.
You can experiment with other hugo flags such as --minify if you want more compact HTML to be generated and --cleanDestinationDir to remove any unwanted static files in public folder in case you removed images that no longer needs to be deployed. I generally prefer deleting public directory altogher and building fresh copy before deployment.
Optional Extras
Open new links in blogs in new window
By default links open within the same window, but you might prefer links to open in new tabs, especially if they are external. Also as per good SEO recommendations, you need noreferrer and/or noopener to be added to your <a> tags generated by the blog. Especially when you are writing blogs in markdown format, you can’t control this behaviour. However, I only want it in blogs and not in the rest of my site.
Fortunately, there is a solution.
Create a folder mytheme/layouts/blog/_markup
Create a file mytheme/layouts/blog/_markup/render-link.html
Inside the file you just created:
<a href="{{ .Destination | safeURL }}"{{ with .Title}} title="{{ . }}"{{ end }}{{ if strings.HasPrefix .Destination "http" }} target="_blank" rel="noopener"{{ end }}>{{ .Text | safeHTML }}</a>
This lets you create safe links whenever you create a link in your blogs.
FYI, creating a link is quite simple in markdown, example: [Noorix Digital](https://www.noorix.com.au) will create Noorix Digital as a link text and generate following code when site is rendered: <a href="https://www.noorix.com.au" target="_blank" rel="noopener">Noorix Digital</a>
Add 404 Error page
Another template file that we commonly use is 404.html for page not found. Usually, webmasters prefer they have a 404 page that still includes site header/footer and structure and has custom actions for 404.
Create a file mytheme/layouts/404.html
{{ define "main"}}
    <main id="main">
      <div class="text-center mt-5">
       <h1 class="display-2">
        404 Not Found
        </h1>
        <h2 class="display-5">Looks like this page is not on our website</h2>
        <a class="mt-5 btn themed-button" href="{{ "/" | relURL }}">Go back to homepage</a>
      </div>

    </main>
{{ end }}
Note, if you just put some random url next to your site in your Hugo development server, it WILL NOT redirect to 404.html. However, you can test it by using the actual link http://localhost:1313/404.html
In production, you will have to add a trigger to your 404 file path where you host it.
Add Google Analytics to your site
This one is as simple as it gets
Add your google analytics code to config.toml
googleAnalytics = "UA-1511XXXX-X"
Next add Hugo’s built-in internal template google analytics template in mytheme/layouts/partials/footer.html right before the closing </footer> tag
{{ template "_internal/google_analytics_async.html" . }}
Breadcrumbs navigation
Completely optional, but if you like your site to have breadcrumb navigation, just as easy to create a autogenerated template.
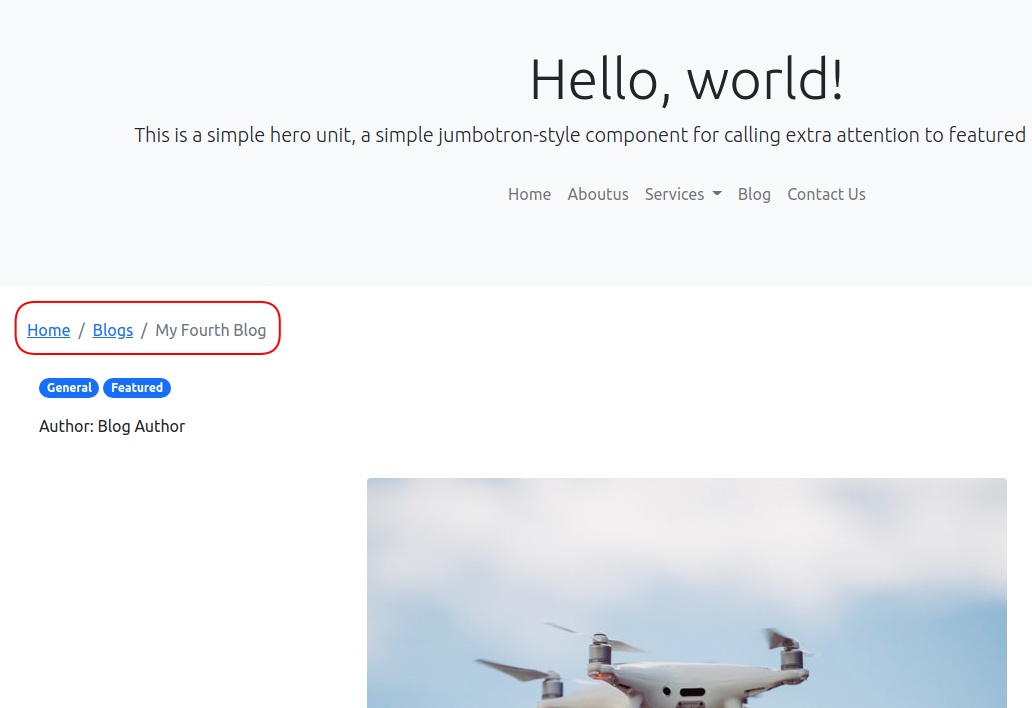
Create a partial mytheme/layouts/partials/breadcrumb.html
Use the sample code below or adapt, this one show breadcrumb on all pages, except home page.
<nav class="breadcrumb container" aria-label="breadcrumb"  >
    <ol class="breadcrumb">
    {{ define "breadcrumb" }}
    {{ with .Parent }}
        {{ template "breadcrumb" . }}
        <li class="breadcrumb-item"> <a href="{{ .Permalink }}">{{ if .IsHome }}Home{{ else }}{{ .Title }}{{ end }}</a> </li>
    {{ end }}
    {{ end }}
    {{ if not .IsHome }}

        {{ template "breadcrumb" . }}
    <li class="breadcrumb-item active" aria-current="page">  {{ .Title }}</li>

    {{ end }}
</ol>
</nav>
Call out the breadcrumb in header or individually where required. I have included this in mytheme/layouts/_default/baseof.html
<!DOCTYPE html>
<html>
    {{- partial "head.html" . -}}
    <body>
        {{- partial "header.html" . -}}
        <div id="content">

          {{- partial "breadcrumb.html" . -}}

        {{- block "main" . }}{{- end }}
        </div>
        {{- partial "footer.html" . -}}
    </body>
</html>
Configure Structured Data Markup
Search engines will appreicate a well written clean HTML page, but even better if you can inject microdata on your web page. This helps search engines classify pages more accurately, such as recipes, organisation, article etc. These results can then appear in rich snippets in google search results. Check the library of google recognised structured data to see which ones you can apply.
They are clearly optional, but here is an example of you can inject in Hugo. You can add as many of these with as many conditions as you like.
create a new partial: layouts/partials/articleschema.html
<script type="application/ld+json">

    {
      "@context": "https://schema.org",
      "@type": "Article",
      "headline": {{ .Title }},
      "image": {{ .Params.featuredImage | absURL }},
      "datePublished": {{ .PublishDate }},
      "dateModified": {{ .Lastmod }},
      "author": {{ .Param "author" }},
      "mainEntityOfPage": { "@type": "WebPage" },
       "publisher": {
        "@type": "Organization",
        "name": {{ .Site.Title }},
        "logo": {
          "@type": "ImageObject",
          "url": {{ .Site.Params.logo }}
        }
      },
      "wordcount" : {{ .Content | countwords }},
      "description": {{ .Summary | plainify | safeHTML }},
      "keywords": [{{ range $i, $e := .Params.keywords }}{{ if $i }}, {{ end }}{{ $e }}{{ end }}]
    }
</script>
Note how the json structure is dynamically created with current page front matter data and site level data. The logo url is missing, so edit config.toml and under [params] add another entry, and replace the link with your logo link
...

[params]
  logo = "https://www.mywebsite.com/images/logo.png"

...
Note how .Summary and word count features automatically create a summary of the content into the structure.
Now time to inject this in the page. Open mytheme/layouts/partials/head.html
<head>
    <title>{{ .Title }}</title>
    <meta charset="utf-8">
    <meta name="description"  content='{{ .Param "Description" }}' />

    <meta name="dc.relation" content="{{ .Site.BaseURL }}" />
    <meta name="viewport" content="width=device-width, initial-scale=1, shrink-to-fit=no">
    <meta name="theme-color" content="#1A94D2" />

    {{ $options := (dict "targetPath" "css/style.css" "outputStyle" "compressed") }}

    {{ $style := resources.Get "sass/main.scss" | toCSS  $options | minify }}
    <link rel="stylesheet" href="{{ $style.RelPermalink }}" media="screen">


    <!--
        include a favicon for your site if you have it, else omit the line below
        Location of favicon can be in mytheme/static/images/favicon.ico
    -->
    <link rel='shortcut icon' type='image/x-icon' href='/favicon.ico' />

      <!-- will load json/ld depending on page type-->
      {{ if and (.IsPage) (eq .Section "blog") }}
         {{- partial "articleschema.html" .  -}}
      {{ end }}


</head>
While we were here, I took the liberty of updating site meta description with {{ .Param "Description" }} as well.
Save and test your site, note that when you are on a blog (not blog list view), you will in page source the json code injected. Here is an example of how it transforms:
<script type="application/ld+json">

    {
      "@context": "https://schema.org",
      "@type": "Article",
      "headline": "My First Blog",
      "image": "http://localhost:1313/images/image1.jpg",
      "datePublished": "0001-01-01T00:00:00Z",
      "dateModified": "2021-01-06T13:03:49.346186377+11:00",
      "author": "Blog Author",
      "mainEntityOfPage": { "@type": "WebPage" },
       "publisher": {
        "@type": "Organization",
        "name": "My Hugo Site",
        "logo": {
          "@type": "ImageObject",
          "url": "https://www.mywebsite.com/images/logo.png"
        }
      },
      "wordcount" :  259 ,
      "description": "\u0026ldquo;Sed ut perspiciatis unde omnis iste natus error sit voluptatem accusantium doloremque laudantium, totam rem aperiam, eaque ipsa quae ab illo inventore veritatis et quasi architecto beatae vitae dicta sunt explicabo. Nemo enim ipsam voluptatem quia voluptas sit aspernatur aut odit aut fugit, sed quia consequuntur magni dolores eos qui ratione voluptatem sequi nesciunt. Neque porro quisquam est, qui dolorem ipsum quia dolor sit amet, consectetur, adipisci velit, sed quia non numquam eius modi tempora incidunt ut labore et dolore magnam aliquam quaerat voluptatem.",
      "keywords": ["hugo", "bootstrap", "serverless", "hosting"]
    }
</script>
Facebook Opengraph, Twitter cards
Sharing your website link on social media? You need to inject Opengraph , developed by Facebook (I think), and twitter card as well, which tells the target social media platfrom to pick the right image for your website and description. I believe Linked and Instagram will also use opengraph.
Inject built-in Hugo templates in mytheme/layouts/partials/head.html. Anywhere inside the <head> tag will do.
...
    {{ template "_internal/opengraph.html" . }}

    {{ template "_internal/twitter_cards.html" . }}
...
Add image entry in config.toml under [params]. Hugo internal template will use that to build the link when it generates opengraph meta tags.
...
  [params]
    author = "Blog Author"
    description = "This is an awesome Hugo Bootstrap site"
    logo = "https://www.mywebsite.com/images/logo.png"
    images = ["/images/site-feature-image.jpg"]

  ...
Check out source page of your site and you should see more meta data in the head of your HTML.
Create Sitemap XML
A good site must have a sitemap. Infact almost compulsory when you submit it on Google Search Console.
Hugo takes care of this by generating a basic sitemap.xml automatically when you build your site with hugo command. Check your public folder. You can tweak it and check Hugo docs for more informationon using sitemap templates.
Enable robots.txt
Easy to add that. Open config.toml
...

enableRobotsTXT = true

...
Create layouts/robots.txt
Put whatever you want to configure… mine is something like this:
User-agent: *
Disallow: 404.html
Sitemap: {{ "https://www.example.com.au/sitemap.xml" | absLangURL }}
Other Enhancements
Blog Commenting
The list of features you can add can be exhaustive, but there are a few other things you may want to research on your own. For example, blog commenting. You can integerate third party commenting systems, such as disqus, or build your own which is the scenic route to wasting your time. Luckily Hugo has built-in template for disqus .
Serverless contact form using AWS
I am in the process of creating a blog on how to create a serverless form and integrate in Hugo. But if you want a head start, there is an official AWS tutorial
While it’s a good article, it does not show the complete process end to end on how to setup email service on SES, google recaptcha etc.
If you are running into any compilation issues or want a shortcut. You can grab a copy of the project from my GitHub repo.
Continue to Hosting Static Website with AWS S3 & CloudFront